As awesome as it is to work on large projects like our Beskar Spear replica, we're big believers in "sweating the small stuff". It's the little details that can make all the difference in a costume, and the intricately folded and pleated leatherwork of the Mandalorian's shin armour are exactly the sort of details we're talking about!
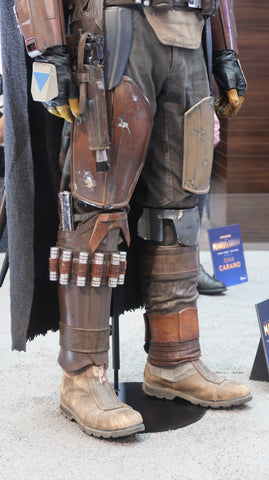
The Mandalorian's costume on display at D23.
We also believe that it often takes a village to research a costume! We've connected with costumers and makers from all over the world over the years, poring over references and bouncing ideas off of one another. When it came to the Mandalorian, once again we hooked up with a bunch of great makers to pool knowledge, ideas, resources and materials together in order to help produce the best costumes possible. One such maker is Debora Di Meo!
Together with Debora, we developed the Mandalorian shins over weeks of intensive research to produce a stunning set of armoured shin pieces. Using all available references we painstakingly deconstructed every layer of both left and right greaves to make sure we left no stone unturned in the quest for accuracy.
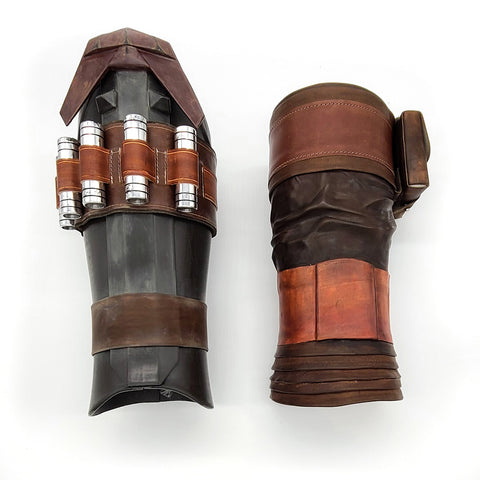
Completed set of shin armour, produced by Debora Di Meo using our shin form!
One of the trickiest details to nail down was the wrinkled leather on the left shin (on the right in the image above). The way that the leather folds and wrinkles is extremely distinct, and appears exactly the same each time. Research and development showed that it was basically impossible to achieve this "perfect imperfection" reliably, with the two biggest problems being that the folds themselves were extremely fiddly to get in the right place and in the right shape, and then those same folds would warp and shift through wear and use. Not good!
So we had the idea for custom-molded shin forms, to solve this problem once and for all! Go big or go home, we always say. The development that went into the production of the shin forms is a whole story by itself, so we'll be doing a blog post about that at a later date. Check out the mold though, it's a beast!
A flexible yet robust rubber shin-form would give makers a perfect "wrinkle form" to apply their leather to which would hold that same precise shape, wear after wear. It was also a "two birds, one stone" situation when it came to achieving a smooth, contoured shape at the back of the calf, which had been proving difficult to replicate using just leather alone.
Our rubber shin form! Created in collaboration with Darren at Great Ape Studios.
Additionally costumers working with a leatherworker can take one of our shin-forms, size the form to their body, and send it to their leatherworker. Leatherworkers take the pre-sized form, apply the necessary leather, and then not only do you have an accurate shape to the pieceandaccurate wrinkle details, you've also got a really solid fit!
Debora very kindly supported us by being our first test subject for these shin forms and the results speak for themselves, she has done a fantastic job!
We are listing the leatherwork patterns for freeas we know how the costs can rack up with these costumes! We also believe that DIY builders can be some of the most innovative makers in our spaces and we know that doesn't always mean you can afford to shell out for every part! All we ask is that if you do feel compelled to give a little something back in return, we have set up a KO-Fifor this and future free projects we hope to publish. We appreciate all the kind support which the community has shown us, it has been nothing short of amazing! But projects like this do still consume so much time in development even though we love what we do.
We share this information for the good of the wider community, and so that in time the small details and how to achieve them are not lost. The sharing and pooling of knowledge and resources shouldn't stop at makers and exist only in the minds of the pioneers. We kindly ask if you do find this information useful to your build - or decide to offer sales of leatherwork based on our patterns - that you credit our research and link to our page so others may find this in future too.
So without any further ado, and with lots of lovely WIP pictures provided by Debora, a guide on how to create your own shin leatherwork!
Right Leg
The right leg leathers wrap around your armour, and as such you will need your armour available for this step. If you haven’t yet identified your armour maker, we can assure you working with Great Ape'sfiles will give you a terrific result.
The first thing to do is to take some measurements. We need the dimension for the upper and lower band - the lower band measurement is taken from the narrowest point of the leg armour when closed. Using a cloth tape measure around the armour and then add 2.25”(57mm) - this will serve as your overlap and closure.
Similarly for the upper band take a measurement around the armour where it is at it’s largest near the top edge and similarly add 2.25” (57mm) for your closure overlap. Take care to ensure your tape follows the shape of the armour closely as your final step will have you glue the piece to your armour permanently.
Fig 1 - Where to take your measurements. Model by Great Ape Studio.
The next critical measurement for you to take is the distance from the rear closure to the central line on the front of the armour. This is shown in the template files and is truly critical as this will be the measurement that positions your second shin cylinder directly over that front strip (where it should sit) so take care to get an accurate dimension on this step.
Fig 2 - Critical spacing dimension excerpt from downloadable template.
Once you have this dimension you are ready to begin templating and cutting your leather. We recommend patterning out your intended cuts on card or paper first to check everything is as it should be. You can even test fit on the armour to check your length measurements. The three layers on the upper shin leather strap can be sewn with a basic sewing machine as the hides used are relatively thin, however it’s always best to practice on scrap before your final assembly.
The base layer is made from veg tan leather with a dark brown (almost black) dye, and has the Velcro strip sewn onto it as shown in the diagram. We recommend sewing the hook side of the Velcro on the top face and the loop side to the rear side (closure) end.
The second strap has a series of small vertical incisions that allow of the ammo loops to pass through however before doing so it’s easier to dye this strap before moving on to cutting the incisions.
Time to dye!
Take careful note of the dimensions on the diagram and make your cuts carefully, your paper test at this stage will be invaluable!
Now that your cuts are made you can stitch your edge details - take care to ensure they are parallel to the edge and your pitch is set correctly (6 stiches per inch). Use a white or off-white heavy gauge thread if your machine can take it. Note that we haven’t asked you to lay it onto the base layer - because we’re going to glue this to your shin armour therefore stitching through the base layer is not necessary and aligning the two without stitching them together can certainly be easier. If you feel your machine may struggle to sew through both the loops and this middle layer then you can apply your topstitches to the areas between the loops now. They wont be as mechanically sound but they will be more than secure enough if you need to work around your equipment’s limitations.
At this stage, your middle strap should be dyed, cut, sewn (either partially or fully) and ready for the loops. Your loop strap is made from a slightly thicker hide than the previous two layers but still veg tan. We recommend you cut and groove your strap using a grooving tool and then dye the strap the desired colour (red-brown). If you find the dye darkens the grooves too much you can run the groover through the edges again, this may reveal a beige tone of the natural finish of the veg tan. In our experiments grooving after the dye and using an orange permanent marker yielded the most accurate look so that’s what we went with! Experimentation is always key if you truly want to replicate the looks of the colours seen.
Fig 3 - Grooving tool for leather.
Now that your loop strap is ready, follow the pattern to weave it in and out of the middle strap. This is also a good time to dry fit your shin cylinders to ensure your loops fit snugly, but remember to remove them as you come to sew (or glue) the middle layer to the loops and base layer.
Loop strap, woven through middle strap, glued and prepped to adhere to base strap.
Once you have trimmed any excess you should be now left with a base layer, and a middle layer with loops woven through it. You can now apply contact adhesive to both surfaces and wait for the glue to become tacky before carefully aligning and gluing the two together firmly. Take special care between and behind the loops to ensure the glue is securely pushed down.
For the lower strap, take your paper pattern and trace it out onto your hide. The final strap will be 2 inches but you will need an additional 0.5 to 1 inch more on both top and bottom (3-4 inch total) to allow you to roll the edge to match the look of the original.
Before you fold and glue your strap however be sure to take note of the raised indentation details - these can either be small neodymium magnets or offcuts of leather (3-4mm thick) embedded in the assembly to replicate the look seen on display at Fan Friday which gave us a lot of great reference photos of the costume. Folding and gluing your strap should be a relatively easy process, including folding over the closure edge so that it also has a rolled finish.
Fig 4 - El Capitan Theatre, photo credit to Dawn Bright.
At this stage you can sew Velcro onto the end of the strap which will be glued onto your armour, and glue Velcro onto the end of the strap that features the indentations - take care to ensure your adhesive is secure and set before testing the Velcro closure.
You should now have two straps ready to be glued to your armour - ensure all painting is completed before this step!
Finished right leg leather straps, featuring our full metal shin cylinders!
Once installed on your armour you can appropriately weather the straps with abrasive pads, Fullers earth, oil paints and other weathering techniques to adequately blend this part into your armour for a truly screen accurate replica.
The first step when working with our rubber shin formis to degrease the rubber surface as best you can. This can be achieved with hot soapy water and will remove any remnants of release compound used during production that may otherwise inhibit your glue.
Cut your rubber form to suit your size, ensuring that you are wearing your flight suit (or jeans to simulate the thickness) and boots when you take this measurement.
You want to measure the widest part of your calf comfortably - this dimension you will transfer onto the widest part of the rubber form.
Then take the measure around the top of your boot - this will be the dimension you transfer onto the narrowest part of the rubber form.
Be sure to cut equally from both sides. For example if your measurement is 5cm smaller than the calf form in that area, mark 2.5cm from each side to make your cut line as shown below. If your calf is larger than the form don't worry, you can easily bridge the gap with leather when covering the form. As the form is made of rubber and the closure has quite a wide overlap there is a lot of flexibility in producing the finished part to suit your size.
At this stage if you are opting for a pre-beskar build you can clean and glue the rubber knee tab into the front of the form. This knee tab is used to attach knee armourto once the shin is complete!
Now we can turn our attention to the templates. Using the scale at the bottom of the downloadable files, print your templates so that the 12in scale on the bottom measures as 12in against a ruler.
Dye your chrome tan hide to suit. Ensure that you use a thin hide for this part so that it flexes easily and isn’t too bulky. If you're using pre-dyed leather you can go straight to cutting!
Use the template to make five pleats, applying glue to the rear lower edges of each pleat and folding as indicated to create a rolled edge. Once the glue has become tacky, starting at the bottom most pleat, lay your pleat onto the assembly layout from the downloadable files and glue the next pleat on top until the assembly is completed.
Do your best to ensure the final alignment of the pleated section matches the curve of the diagram - this unusual shape is patterned intentionally so that the pleats flare out at the front but remain fairly flat on the sides and rear of your boot.
For the strap and textured/wrinkled part we strongly recommend reviewing Debora’s videos as there aremany nuances to the assembly process of this piece. Debora's Youtube channel where she has her own video walkthroughs for this part of the buildcan be found here.
The template patterns are designed for the calf unmodified so expect that you will need to make some modifications to suit your size if you have cut the form down or scaled up size for your calf. We made a set of additional 3D printable tools to be used by those in the community who are planning to produce finished products for the community. Please get in touch if you would like the files for these tools (digital files for 3D printing).
Congratulations, you’ve ran the Kessel run of calves! You're one step closer to collecting bounties across the galaxy!
Best of luck with your builds!
~ Luke Daley
Edited by Morti Short.
Special mention to Darren Pattenden of Great Ape Studio & Debora Di Meo for their support and contributions to this production!